So another blog...another repair job. This time it's caravans. A 1991 Elldis Typhoon. Our trusty race support and holiday home. I have been aware of a damp issue on the front right corner. No visual problems inside but the blind has come away and there's nothing left to screw it back to. Further more the wall board adjacent to the window is now soft. The last time we towed it arrived home with half the screws missing from the awning rail! If I ignore it for much longer I just may check my mirrors to find a trailer following me in place of the caravan I left home with.
 |
| This has to come off first! |
First job is to remove the nose cone, Starting with windows and the storage lid, followed by awning rails and handles. The edges separated easily as the old mastic was pretty dry.
From here the extent of the damage becomes obvious !! We need to replace the whole timber structure.
Further digging thankfully found solid timber not too far away. So taking some accurate measurments and plenty of photos the rebuild starts.
I stripped out everything on the right corner as this is the area of worst rot. I Replaced the awning rail timber using adhesive to bond, I have found that polyurathane adhesives work very well. Sika 512, Tiger or any similar product will do. I also found local bodyshop suppliers to stock this stuff at a fraction of online "caravan" prices.
 |
| Clamped up new timber bonded |
From here I worked across the top horizontal timber, I replaced it and that meant that I could remove the window structure safe in the knowledge the basic structural foundations were sound. The horizontal support required making 2 joined sections to complete and a rebated face to allow the glassfibre nose cone to fit correctly. A router came in handy for the manufacture of the timber sections, a block plane to size the section and more of that wonderful PU adhesive .
 |
| 1st part of the new structure, fitted under the roof skin |
From here remove and copy the timber frame for the window section, careful measurement here if its all going to fit well later on!!!
 |
| Window sill section re cut from 18mm WDP board (Standard fit was disappointingly chipboard ...yuk!) |
 |
| Window section removed |
 |
| New window construction starts |
 |
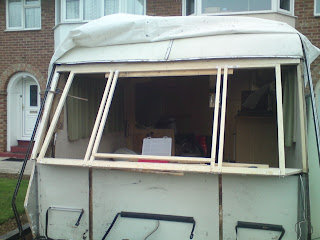
| Temporary staples to trial the frame in place, this will be permanently fixed later |
 |
| Mock up, do this regularly at every stage to ensure mistakes are found |
 |
| Nose cone offered up to new frame, good fit so it's going right so far.... |
 |
| Permanent fixing techniques: Biscuit jointing and PU adhesive seems a better solution than staples |
 |
| Looking more like it now.... |


