Sunday, May 1, 2011

Caravan Repairs...continued

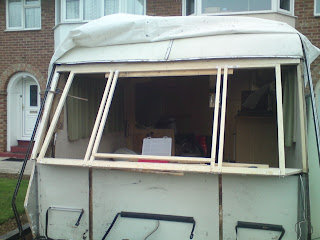
Last time out I had just completed the basic timber structure of the front, next step was to finish the frame with window section ans offer up and begin to fit the front section. I needed to ensure I sealed as I went and this phase puts me on a steep learning curve, only one shot at this ....have I made any mistakes....well lets find out:

Window structure added

Insulation fitted and additional support spars

FRONT SECTION FITTED NEXT BUT NO PHOTOS TAKEN! DOH.......


Internal wall boards, cut from plywood and wall papered to suit

Bonded in place (polyurethane adhesive again)


Seaking up the roof skin, mastic tape used for this joint

Window seal going back in, used a 3M windscreen sealer for this job.  Once in I fitted the window rail, again with mastic to seal.


All windows and seals now fitted 


Internal fittings, locks and stays going back in


Storage lid back on and looking good, no issues so far!


Awning rails, I was not looking forward to removeing and re sealing these, turned out not too bad, 1 day and job done, remove, clean, reseal and fit. Both sides done.


Finishiing jobs, internal window shelf and trim fitted.


Very happy with the results so far, finish is good and the old van is looking solid again.

Blinds are the next issue, but I have booked a 4 day spot in the peak district in 2 weeks time. Just to keep some pressure on!

Saturday, April 9, 2011

Caravan Repairs

So another blog...another repair job. This time it's caravans. A 1991 Elldis  Typhoon. Our trusty race support and holiday home. I have been aware of a damp issue on the front right corner. No visual  problems inside but the blind has come away and there's nothing left to screw it back to. Further more the wall board adjacent to the window is now soft. The last time we towed it arrived home with half the screws missing from the awning rail! If I ignore it for much longer I just may check my mirrors to find a trailer following me in place of the caravan I left home with.

This has to come off first!
First job is to remove the nose cone, Starting with windows and the storage lid, followed by awning rails and handles. The edges separated easily as the old mastic was pretty dry.


From here the extent of the damage becomes obvious !! We need to replace the whole timber structure.

Further digging thankfully found solid timber not too far away. So taking some accurate measurments and plenty of photos the rebuild starts.

I stripped out everything on the right corner as this is the area of worst rot. I Replaced the awning rail timber using adhesive to bond, I have found that polyurathane adhesives work very well. Sika 512, Tiger or any similar product will do. I also found local bodyshop suppliers to stock this stuff at a fraction of online "caravan" prices.

Clamped up new timber bonded
 From here I worked across the top horizontal timber, I replaced it and that meant that I could remove the window structure safe in the knowledge the basic structural foundations were sound. The horizontal support required making 2 joined sections to complete and a rebated face to allow the glassfibre nose cone to fit correctly. A router came in handy for the manufacture of the timber sections, a block plane to size the section and more of that wonderful PU adhesive .

1st part of the new structure, fitted under the roof skin
From here remove and copy the timber frame for the window section, careful measurement here if its all going to fit well later on!!!

Window sill section re cut from 18mm WDP board (Standard fit was disappointingly chipboard ...yuk!)

Window section removed

New window construction starts

Temporary staples to trial the frame in place, this will be permanently fixed later 

Mock up, do this regularly at every stage to ensure mistakes are found

Nose cone offered up to new frame, good fit so it's going right so far....
Permanent fixing techniques: Biscuit jointing and PU adhesive seems a better solution than staples
Looking more like it now....


Thursday, March 17, 2011

Engine Rebuild - part 2

Last time we left off the crank bearings had been fitted ready for the rebuild. Next job was to fit the crank seals and assemble the casings.

From this point the internals were assembled, this includes fitting the crank to the RHD (clutch side) casing. Again gentle heat with the heat gun allows the bearing to ease onto the crank shaft.

IMPORTANT POINTS: Do not forget to fit the small gear pinion, Ensure the selector forks and rods are fitted correctly.


LHD casing fitted now - But don't forget the 1st gear pinion - (Its not yet fitted in this picture, bonus points if  you can see where it should be???)


Above -selector fitted and crank gears assembled 

NOTE FIT KICK START PINION AND CLUTCH WASHER NOW!!!

Clutch baskets assembled and ready to be bolted using another reaction tool (Home made)


Clutch plates fully fitted, note I use 4 rather than 6 springs. Makes the clutch lighter to operate.
If you do this remove opposite pair to maintain balance


Note the spring retaining collar must be located in its lug, get  it wrong and you'll spend hours trying to figure out why the clutch case does not fit. 


I use a syringe to give initial lube to crank and big end bearings


Piston and head all cleaned up and ready to go....Don't forget the c clip !!!


Soft solder ready to measure the squish band, measure in three or four places to be sure.


Measuring the solder, in this case 1.45mm - I adjusted this by removing a base gasket to get 1.25mm

Notes: - For a 250cc the min squish is 0.9mm heading up to 1.5mm for a softer power response.


The bike was then reunited with the motor, this took longer than I anticipated, but we got there in the end. Once filled with fluids and quick check all bolts were tight it was ready to start. It started maybe 3rd kick and settled to a nice idle on the choke. It sounded a little less "poppy" but until I knocked off the choke it was too early to detect any improvements. Being impatient of course I knocked the choke off quickly and found the motor to be fuelling OK, a very slight hesitation on the throttle but it was of course still cold. As it warmed I was able to dial back the tick over and tweaked the idle mixture screw to 3.75 turns out. This now meant the bike could idle on the verge of stalling, significantly lower idle rpm than before, a blip of the throttle resulted in a positive blat from the exhaust. I had a gentle ride round the garden and the bike showed much better throttle manners. Slow turns could be controlled with throttle and the slow idle running was making this much easier. A flick on the throttle gave instant response and resulted in a lightly lofted front wheel . Overall a huge improvement. I will tweak the carb settings on the next trial but for now I am just looking forward to riding it again.

Hope you found this useful and / or interesting.......

Bally

Wednesday, March 16, 2011

Gas Gas TXT Strip down

So having lived with the poor idle and throttle response on my 1999 TXT 250 I have eventually "got the hump"
Of course I considered the obvious - sell it on Ebay and buy something else, but its just not my style. Why do that when I could take it to bits in search of the cause.

I had looked at the exhaust and carb early on and other than internal baffle damage I found nothing obvious. A new plug and and an increase in the size of the pilot jet had eased the symptoms. But now, some 4 trials later,  I feel the problem is holding me back. Its not that I am blaming the tools but rather I am pretty crap at this trials thing, thus I need all the help I can get, and a bike that runs well can only help, right?

Anyway enough mumblings lets get on with the show...

The Symptoms:
Most obviously the Idle is unstable and the bike responds poorly to a large dose of throttle from idle. Initially it bogs then revs and settles slowly. If left it unprovoked it will slowly progress towards inevitable stall, regular blips are needed to keep it going. None of which helps when navigating a section! The idle mixture screw is effective from fully in to about 2 turns out then makes no difference. (The clue... something else is controlling the idle conditions)

The Plan:
I think its lean at idle, the hesitancy and lagging response point that way. Also applying a bit of choke even when hot helps the response for a short period. The inlet track looks OK and no signs of base gasket leaks. The filter is intact, correctly positioned and clean. So possibly a leaking bottom end seal (flywheel). Another train of thought is simply strip and rebuild from the start, then I'll know whats in there and how good the motor really is.

Having ordered 2 crank seals, crankcase gasket, head gasket and a new set of read petals we are good to go. A shout out to Gas Gas UK (Tel: +44 (0)1298 766813) for the great service so far, delivery is fast and staff are knowledgeable, well done and thanks.

Pulling it apart:

I wont bore you with the chassis removal - assume it fell out and now its on the bench!
HERE WE GO......
CARBONISED HEAD


READ GAPS!!


STATOR PLATE POSITION

HOMEBREW CRANK NUT REACTION SPANNER
This nut was tight and the lock washer was only going to make things harder, So I started the compressor and attempted a gentle run with my 1/2" Aldi Air impact Gun, but yet again this piece of crap tool had seized up over the winter, so after 10 frustrating minutes trying to free it up I chose to beat it to death with a hammer and threw it in the bin!

Attempt 2 - 10 mins making the spanner above and the nut had no choice but to surrender. Job done and another special tool for the box!
KICKSTART SPRING
GEAR SELECTOR ASSY
 At this point photos are limited but from the stages above I proceeded to remove all clutch related parts and split the cases. The cases were stubborn to move and I found that tapping with a mallet was going no where. Instead I used 2 bolts in the underside casing and prised the half's open with some soft wood. A very gentle approach with repeated applications of force saw the half's ease open.Once apart  I gained a better understanding of what was going on. The internals looked like a coal mine, I suspect the blocked baffle that I sorted in the first few days of owning the bike had been blocked for some time. Hence exhaust gas had been forced into the crankcase and coated everything. New main bearings were certainly needed (ordered from RS components for £5 each, spec number: 6062 ) I  used an electric heat gun to warm the casings and pressed the bearings out, heat may not be necessary but certainly helps to ease the job.

Everything was then given a thorough clean and inspection. The piston and bore looked to be in good health, measurements with the bore gauge showed skirt clearance to be at just under 0.003". I deemed this OK to go back together - considering also that Gas Gas UK could only offer a piston kit at £125 then my budget means the rings would be also continuing service, for the time being at least.

The bearings were pressed into the casings (again with pre- warmed casings) in readiness for the rebuild.

To be continued.....